8. Add custom links to the menu that can link to any URL
9. Google Font Setup
10. Google Analytics Setup
11. Larger header logo size
12. Make header description visible at responsive sizes(mobile and tablets)
13. Remove background image tint (opacity)
1. Have a black box at the top of your posts ?
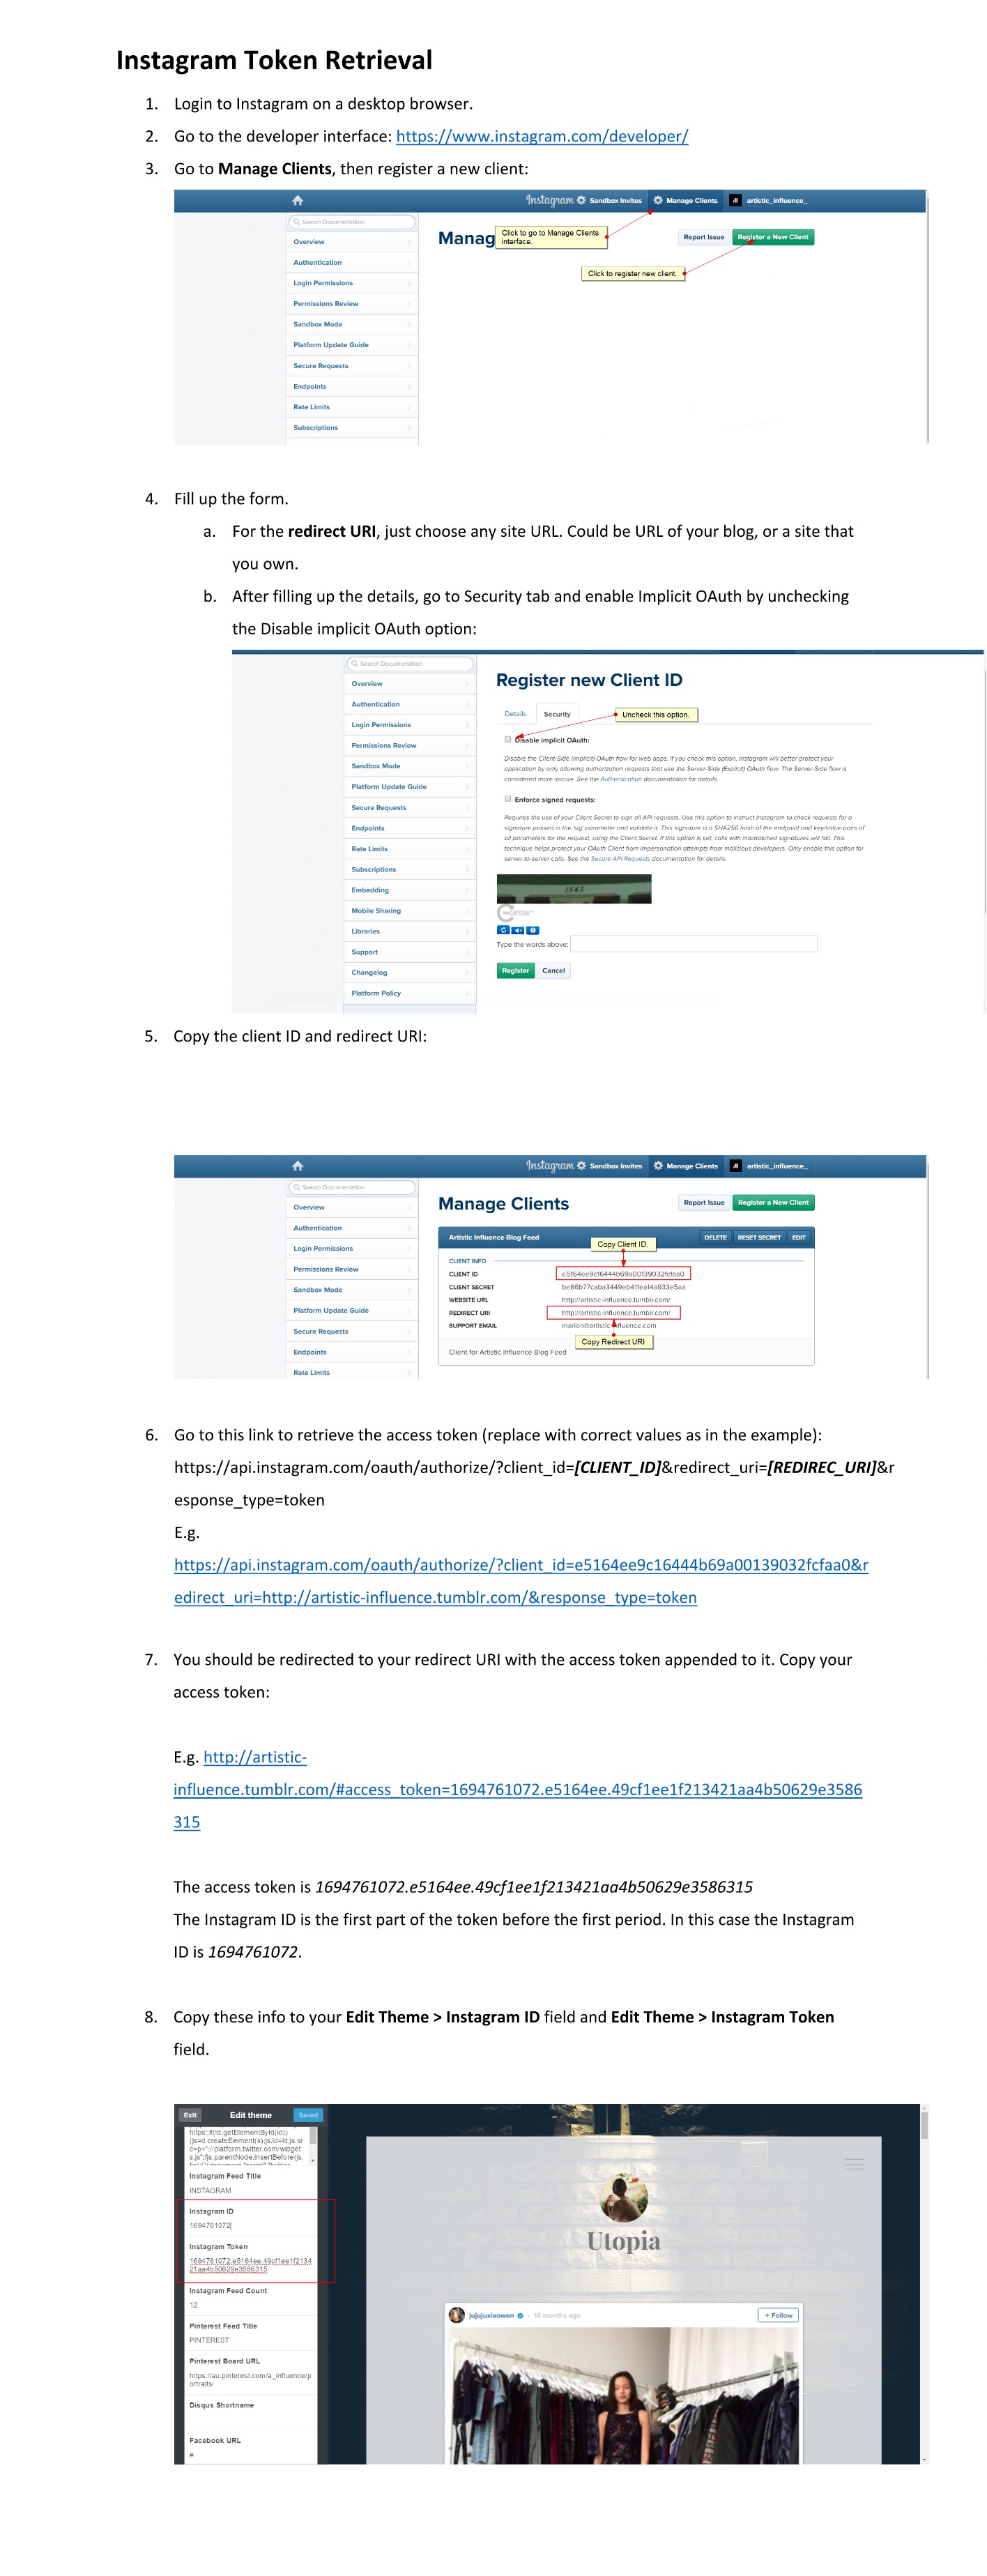
That black box on your blog is the Instagram feed not working correctly, this is usually because the details entered into the "Instagram Token" and "Instagram ID" in the "Edit Theme" section may have a couple wrong digits. This can be fixed no problem :D
We have a tutorial written up in the documentation which can help get this up and running for you. The tutorial is very simple to follow step-by-step instructions with images and can help you get it up and running within a few minutes.
If you’d like a Instragram feed on your home page as seen in the Candice demo, you will need two pieces of basic info which is your Instragram ID and Access token. This can be done quite easily by following the instructions below.
Instagram ID and Access Token - Luckily this information is quite easy to retrieve even for non-developers.
3. Twitter Feed Setup
We have a great tutorial to help get the Twitter feed up and running within our documentation. The tutorial includes step-by-step instructions + images to help you get it up and running within a few minutes.
First head to the “Edit Theme” panel, next scroll down he left hand sidebar till you reach the bottom and click “Advanced Options”. On the next page, copy and paste the code below into the “ADD CUSTOM CSS” field. Make sure to copy the code exactly as it is including full stops and bracers and also hit save when done.
.tile-grid {width: 60%;}
Note: The width in the code is set at a 60% value(default is 80%), however you can change the “60%” value in the code to a smaller value such as 55% 50% or even smaller if you wish for a thinner grid width or change it to a larger value if thats what you fancy. However it’s important to note that the theme was made and tested only for the default sizes so depending on how big or small you adjust the grid width there may arise some inconsistencies in regards to elements being out of proportion, the areas of big effect would be video and movie posts. In the case that the layout breaks(which would only happen if the value is far off from the default), there won’t be much we can do to help you with fixing that as at that point the theme will be to far beyond the original product. In this case you can just remove or re-adjust the 60% value.
5. Reposition text to the bottom of posts
This is possible but to a certain extent. What we'll be able to do is help you re-position the text on media type posts to the bottom of the post(rather than a separate box below the post content which would require altering the HTML structure and outside the scope of our support).
To make this happen is quite simple, just follow the instructions below and you'll have it in effect within 5 mins. :D
First head to the "Edit Theme" panel, scroll down the left hand sidebar till you reach the bottom of the page and then click on "Advanced Options". On the next page you will see a code input field with the title "ADD CUSTOM CSS", you will need to copy/paste the code below into this field then hit "Save" when you are done. Also, make sure to copy/paste the code exactly aas it is displayed including fullstops and curly bracers or the code may not work.
This is possible, you will just need to follow some instructions below to make this happen. First head fo the "Edit Theme" section, scroll down the left hand sidebar till you reach the bottom of the page and click "Advanced Options". On the next page you will see a code input field titled "ADD CUSTOM CSS". You will need to copy/paste the code below into this section and click "Save" when done.
Make sure to copy the code exactly as displayed including fullstops and curly bracers or the code may not work.
This code below will fix the left alignment for lists throughout the theme.
To use it, you will first need to head to the "Edit Theme" panel, scroll down the left hand sidebar till you reach the bottom and click, "Advanced Options". Once you are on the next page you will see a code input field with the title "ADD CUSTOM CSS". You will need to copy/paste the code below into this field then hit save. Make sure to copy the code exactly as shown including curly bracers and fullstops or the code may not work.
.tile-content ul, .tile-content ol {padding-left: 3px;}
.tile-content ul li, .tile-content ol li {margin-left: 0;}
8. Add custom links to the menu that can link to any URL
First head to the “Edit Theme” section and on the left hand sidebar you will need to click the “Edit HTML” button. Once the HTML editor opens up, you will need to look for this exact line of code:
{/block:IfMenuSendEmailLabel}
Once you find this code, drop a new line afterwards.
Now, you will need to make an alteration to the below code and paste it on the new line:
With the code above, the first item you will need to change is the URL within the quotes: http://artistic-influence.tumblr.com
This is the target URL you want to link to.
Next is the text:
VISIT OUR BLOG
This text is what will be the label of this link. In short, the is the part of the code that will be visible on the front end to your visitors. This can be anything you want.
Once you have made these adjustments, copy and paste the code right after {/block:IfMenuSendEmailLabel}
Now hit save and now you should have a new menu link. You may need to give it a minute or 2 for the changes to take effect.
9. Google Font Setup
Although Tumblr offers some awesome fonts for all users to incorporate into themes for free, you may or may not find exactly what you are looking for which is why we've integrated Google Fonts into every theme we make. Google Fonts has over 500+ free fonts available to anyone. Depending on your experience with using Google Fonts, you may run into some difficulties in figuring out how to use your chosen font which is why we've created this infographic below to help you set up your font through textual and visual instructions.
If you’d like to monitor your sites analytical data and have registered for Google Analytics, you can easily add your tracking code into your blog. If you do not yet have a Google Analytics account, visit http://www.google.com/analytics/, register an account for your blog website.
Now, assuming you've ticked off the prerequisites required for setting Google Analytics up on your blog, simply visit this link below for step-by-step instructions made out in infographic style to help guide you through the setup process in as simple of a way as possible:
If you still have any issues, don't hesitate to drop us a support ticket and we'll get back to you as soon as we can.
11. Larger header logo size
This is possible, you will just need to follow some instructions below to make this happen. First head to the "Edit Theme" section, scroll down the left hand sidebar till you reach the bottom of the page and click "Advanced Options". On the next page you will see a code input field titled "ADD CUSTOM CSS". You will need to copy/paste the code below into this section and click "Save" when done.
12. Make header description visible at responsive sizes(mobile and tablets)
Initially we've hidden the header description for responsive sizes because many people had very long descriptions and it was breaking the layout on mobile devices as the description filled out the screen, however if your description is short and sweet it wont be a problem to enabled it !
To do so you will just need to follow some steps below:
First head to the "Edit Theme" section, scroll down the left hand sidebar till you reach the bottom of the page and click "Advanced Options". On the next page you will see a code input field titled "ADD CUSTOM CSS". You will need to copy/paste the code below into this section and click "Save" when done.
Make sure to copy and code exactly as displayed including fullstops and curly bracers or the code may not work.
@media only screen and (max-device-width: 736px) and (min-device-width: 320px) {.prof-description {display: initial!important;}}
13. Remove background image tint (opacity)
We've added opacity to the background image as sometimes it may be a little hard to read the header text depending on the color of the background image. This is however, situational and depending on the background image and text color.
Below is a code snippet to help bring the full color of your background image back. First head to the "Edit Theme" section, scroll down the left hand sidebar till you reach the bottom of the page and click "Advanced Options". On the next page you will see a code input field titled "ADD CUSTOM CSS". You will need to copy/paste the code below into this section and click "Save" when done.
Make sure to copy and code exactly as displayed including fullstops and curly bracers or the code may not work.